modbus_fastd - Modbus Daemons
This is still a DRAFT and needs revision!
| Extension Version: | 1.7.3a |
|---|---|
| Supported SONARPLEX Version(s): | 5.1.1a or higher |
| Requires: | Modbus compatible azeti device. (M) at the end of the model name shows Modbus compatibility
|
| Required by: |
|
On this page:
About
The modbus_fastd Addon consists of two independent Modbus Daemons, one for each available serial interface of the device. The Add-on itself runs only on hardware devices as it requires the physical interface access. It provides the daemons, that collect all check requests from the surrounding check plugins and schedules those for execution. It provides check results asynchronously and supports prioritization as well as a custom delay.
The Add-on requires Modbus compatilbe service check plugins or Add-ons as it only provides the basic interface to the Bus.
Use Cases
The add-on provides an interface to all kinds of Modbus enabled devices like stand alone sensors or for connecting to legacy hardware.
Some common monitoring use cases:
- Dry Contact Monitoring (alarm reporting via contact switching)
- Door State Monitoring (Open / Close)
- Temperature and Humidity
- Fuel Level in tanks
- Luminosity and environmental metrics in general
- Access Control via keypads
- Motion detection
Functional Principle
The daemons offer the basic connectivity layer for plugins and addons above that leverage the daemons Modbus capabilities.
The Modbus Daemons are the major prerequisite for any Modbus related plugin or add-on.
The daemons gather all check requests from Modbus compatible plugins and schedules these depending on their priority and type. Depending on the check command of the service it is differed between two types. These types are distinguished on the scheduling approach. These approached are explained below.
Scheduled Daemon Checks
Scheduled daemon checks are service checks, which are scheduled by the monitor process and executed directly by the daemon. For example gathering the temperature reading of a MODBUS-sensor every 5 minutes.
Plug-ins that use this approach:
- check_modbus_fast_read3
- check_modbus_fast_write3
Immediate Daemon Checks
Immediate checks are necessary for monitoring time crucial states like it is the case with dry contact monitoring or motion detection.
Upon the first receipt of a new immediate check, the daemon puts the request into its own internal queue. Checks within this queue are executed as fast as possible (depending on the queue length). The bigger the queue, the larger the time gap between checks.
The last check result of each queued service check is saved and compared to the new one. As soon as the value changed, the daemon will send an immediate alarm to the monitor process. This saves a lot of time and system LOAD as only changed states are reported.
Understanding this new approach is important since the scheduling of the check is now carried out by the daemon after its first execution, rather than the monitoring process. Therefore scheduling parameters such as check an interval, for each MODBUS service check are important.
Plug-ins that use this approach
- check_modbus_fast_access-m2m
- check_modbus_fast_drycontact3
1.4.1 Typical use cases
Time critical monitoring tasks should be accomplished with the above plugins.
- Motion Detection
- Dry Contacts
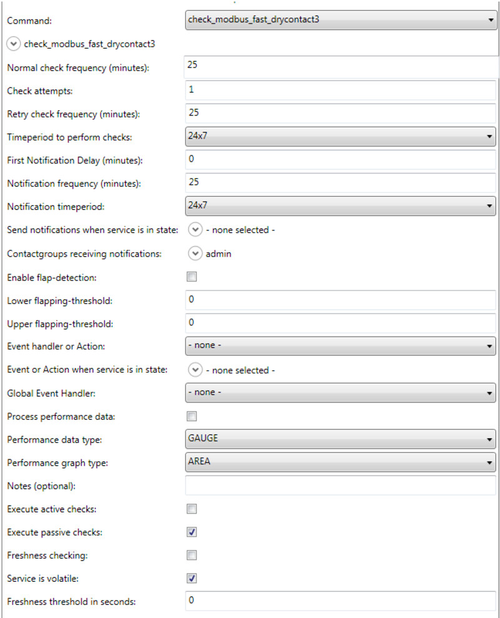
1.4.2 Service Check Configuration
The daemon queues the checks, there is no need for low check intervals and retries as each value change will be reported to the monitor process immediately. Use a service check configuration as described below to save system performance and to avoid unnecessarily scheduled checks.
- MODBUS Plugin Overview
2.1 modbus-fastd
Daemons for the COM ports. Make sure you install these first!
2.2 check_modbus_fast_read3
Topic(s): Sensor monitoring. Reading analogue values from MODBUS registers, e.g. collect a temperature value of a sensor.
Execution Time: Scheduled
2.3 check_modbus_fast_write3
Topic(s): Writing single register values to MODBUS registers. For example switching on/off a sensor relay. This will become obsolete with the upcoming SONARPLEX actions.
Time Plan: Scheduled
2.4 check_modbus_fast_drycontact3
Topic(s): Dry Contact state monitoring.
Time Plan: Daemon Queue, Immediate Alarms
2.5 check_modbus_access_m2m-wtsc
Topic(s): Access control monitoring with “M2M-WTSC-RS485” converter devices and Wiegand Keypads.
Time Plan: Daemon Queue, Immediate Alarms
- MODBUS-Setup Extension
With generation three checks, a new extension was introduced, the MODBUS-Setup Addon. This is intended to ease the basic setup of MODBUS based devices. It features a set of pre-defined commands that can be executed from the administrative Web-GUI. Therefore no manually configured check_modbus_write-service checks are no longer required.
Simply install the Addon and click on the new link within the administrative Web GUI (bottom menu), then you can choose the desired action from the drop down menu and execute the command.
When writing a value to a particular register, make sure that you read the new value afterwards to ensure that the new value was written correctly.
Below is a preview of the available commands that can be executed. These range from the simple reading of registers to changing complete device configurations.
- Dry Contact/Thermistor Monitoring
Plug-In: check_modbus_fast_drycontact3
This plug-in is used for the monitoring of dry contacts as found on most legacy devices and often used for theft monitoring.
Note: Do not monitor analogue readings (see next chapters) with this plug-in as it will lead into a higher than expected SONARPLEX load.
4.1 Binary vs. Analogue Readings
Make sure that you only use this plug-in for registers that respond with a binary value (“0” or “1”). Sometimes devices must be reconfigured to represent an output state in binary rather than an analogue reading.
The analogue reading will always waver within a range of values (open: 0 ~512, close: 513 ~1024) rather than a hard value of 0 / 1. The underlying “Fast MODBUS Daemon” will then send an alarm every time the value changes even though the contact state is still considered as “closed”.
4.2 Dry-Contact Switch Configuration
By default the Temco T3-8I13O and T3-32I represent the dry contact state as an analogue reading. Writing to particular registers can reconfigure this. To do so, use the SONARPLEX extension “MODBUS-Tester”.
The appropriate registers and values are listed below and can also be found in the official Temco manual.
4.2.1 T3-32I
Make sure the jumpers inside the device are set to “Thermistor Mode”.
Register: 228 – 259 (where 228 is INPUT1 and 259 is INPUT32)
Value: 0 (RAW mode), 4 (ON/OFF mode), 5 (OFF/ON mode)
Example: For reconfiguring INPUT3 to represent ist state in ON/OFF mode write the value ‘4’ to register ‘231’.
4.2.2 T3-8I13O
Make sure the jumpers inside the device are set to “Thermistor Mode”.
Register: 183 – 190 (where 183 is INPUT1 and 190 is INPUT32)
Value: 0 (RAW mode), 4 (ON/OFF mode), 5 (OFF/ON mode)
Example: For reconfiguring INPUT3 to represent its state in ON/OFF mode write the value ‘4’ to register ‘185’.
- 10K Sensor Monitoring (Temperature Sensor)
- Pulse Count Monitoring (Door Open/Close)
- Best Practices and Common Mistakes
Analogue readings vs. check_modbus_fast_drycontact3
Don’t use check_modbus_fast_drycontact3 with analogue readings, make sure it reads either 1 or 0 (ON/OFF mode for Temco T3 dry contact switches) to avoid unnecessary daemon alarms. Reading analogue values will lead to:
- Heavy CPU usage
- High System Load
- Slow Web Interface
- Slow SONARMANAGER Status Download, Configuration Up/Download
Installation
 to start the upload
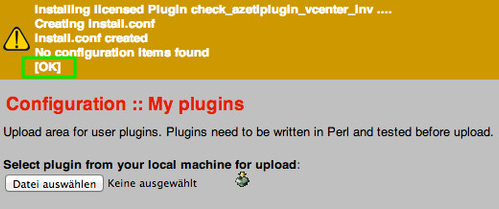
See the Managing Extensions with the Administration Web Interface article for further information.
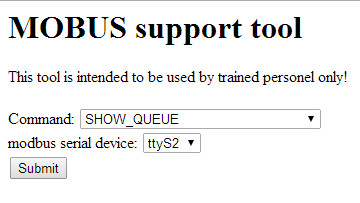
Modbus Query Tool
The package comes with an advanced tool to check performance metrics of the daemons.
The Modbus support tool can be accessed through the Administration Web Interface, e.g. http://example.com:81/cgi-bin/modbusd_query.cgi
Configuration
The add-on itself is nearly configuration-free as all parametrization is done within the related Modbus extensions. Only some system parameters should be considered for fine tuning. Please reference to Modbus MoniTorturing - Best Practices and Performance Insights in order to have an overview of the main configuring parameters and their influence in the system.
Service Reaper Frequency
This setting defines how often the Monitor Process is harvesting the gathered results form the daemon. The lower the setting the more often results are harvested but this can other hand lead to higher system loads.
- Open the Administration Web Interface > Configuration > System > Load Configuration
- Adjust Service reaper frequency in seconds
Modbus Delay
This parameter specifies the delay between individual Modbus calls on the bus. This will make the Modbus interface poll with less frequency the devices connected to the bus. This delay helps to spread the check and processing of the individual results and can lower the overall system load.
Open the Modbus Support Tool
- Choose RECONFIGURE_DELAY from the Command drop-down
- Adjust the value and save it by choosing Submit
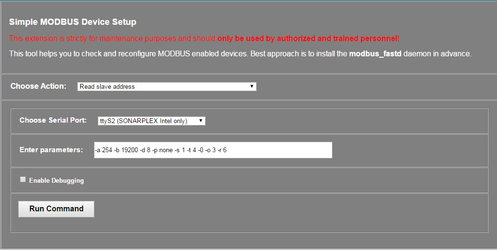
Simple Modbus Device Setup
This tool for setting Modbus devices can be accessed through the Administration Web Interface > AddOns > modbus-setup
Troubleshooting
I do not see all the modbus configured services in the MODBUS-Setup tool
Restart the daemon for the port you are testing in the MODBUS-Setup tool
I am receiving “Reply Time-Out” in MODBUS-Setup
Make sure you don’t mix old generation MODBUS plug-ins and generation 3 plug-ins. These use different daemons and will fail when used together. Especially “check_modbus_access” should not be used in combination with newer plug-ins.
I tried to write a new register value to a T3-8I13O but the value does not change.
Cycle the device and try again.
Modbus is a complex topic that normally needs trained personnel to deal with. Please contact support@azeti.com in case you need help configuring your devices.
- style