Introduction
The Config and Provisioning is one of the most critical parts of the Administrators tasks, as it deals with the the configuration of the sensors on all sites. The tasks included here are:
- Configure and deploy the sensor templates that will be running on all sites
- Manage software updates
- Make changes on the sites software basic configuration.
Templates
Definition, Types and Structure
Templates are xml files which contain all the sensor configuration for all the sensors. This includes sensors, actions, rules and everything the azeti SiteController is programmed to do. This file will later be deployed to each site.
Here is an example of a simple template:
<component_template config_version="1" schema_version="1.0">
	<description>Generic MODBUS TCP 1 Analogue</description>
	<class>multi-sensor</class>
	<vendor>azeti</vendor>
	<version>1</version>
	<sensors>
		<sensor sensor_id="Analog_Input_1">
			<sensor_class>unknown</sensor_class>
			<unit>mA</unit>
			<sensor_gateway sensor_gateway_id="gw_Generic_MODBUS_TCP_analog_inputs">
				<demux>
					<keys>
						<key>301</key>
					</keys>
				</demux>
				<calibration_rule>
					<raw_result_factor>1</raw_result_factor>
					<rounding_precision>2</rounding_precision>
				</calibration_rule>
			</sensor_gateway>
		</sensor>
	</sensors>
	<devices>
		<device device_id="dev_Generic_MODBUS_TCP">
			<modbus_device pdu_addressing="true">
				<modbus_tcp>
					<address>192.168.123.123</address>
					<port>502</port>
					<slave_address>1</slave_address>
				</modbus_tcp>
			</modbus_device>
			<sensor_gateways>
				<sensor_gateway publish_strategy="always" sensor_gateway_id="gw_Generic_MODBUS_TCP_analog_inputs">
					<modbus>
						<modbus_register>
							<register_address>201</register_address>
							<register_count>1</register_count>
							<block_type>analog_inputs</block_type>
							<timeout>1000.0</timeout>
						</modbus_register>
						<scheduling>
							<polling_interval>1000</polling_interval>
							<error_handling>
								<retry retry_algorithm="linear" retry_interval_before_alert="30000" retry_polling_interval="1000" />
								<timeout_handling>
									<fixed_timeout>1000</fixed_timeout>
								</timeout_handling>
							</error_handling>
						</scheduling>
					</modbus>
				</sensor_gateway>
			</sensor_gateways>
		</device>
	</devices>
</component_template>
Types
The templates are divided into the following:
- Components: This are the basic building blocks. They represent a certain physical sensors, and include all the data points, connection information, etc. necessary to make it work. They have to be created manually with a text editor and uploaded to the server. azeti already posses a library of ready to use components. For example, a component would be the template for the Comet Temperature Sensor. The components can be shared across organizations, but cannot be edited.
- Component Instances: This are copies of the compoments. They are local to each organization, and can be edited using the built in editor of the cloud. Most common reason for editing would be to adapat the connection info of the sensor (for example, the IP address). Several component instances can be created from the same component, and they will share the same configuration. For example if there are several temperature sensors on the same site, several temperature sensors component instances have to be created from the same temperature sensor component.
- Site Templates: The site template includes all the sensors that a site has. This means it has all the component instances for all the sensors of that site or type of site. The same site template can be assigned to several site, so that if all the sites have all the same sensor any change has to be done only to the site template in order to all the sites to get it.
- Location Templates: The location templates are site template customized for an specific site or location. They can only be assigned to one location, so they are use for only specific changes (for example to change the size of a fuel tank).
Hierarchy and inheritance
The logical structure to build the templates is:
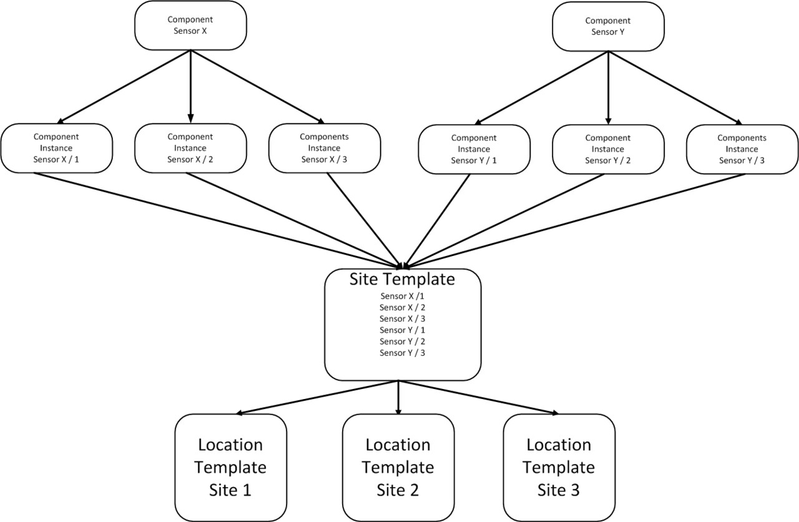
All the changes done to a template are inherited to the templates below them. So if a sensor inside component instance is edited, all the site templates and locations templates that use it will be edited as well automatically. The exception being those changes that were done directly on the lower template. So if, for example, sensor X state threshold is changed on a site template, and then on a component instance, the change done directly on the site template will take precedence, and the change done on the component instance will not be applied.
Using Components and Components instances
The first step to create a template would be to upload one:
- Go to Configuration → Templates → Component Templates
- Click the +Add button
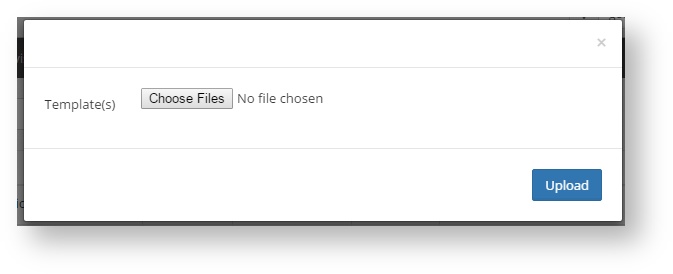
- Choose the file and click upload
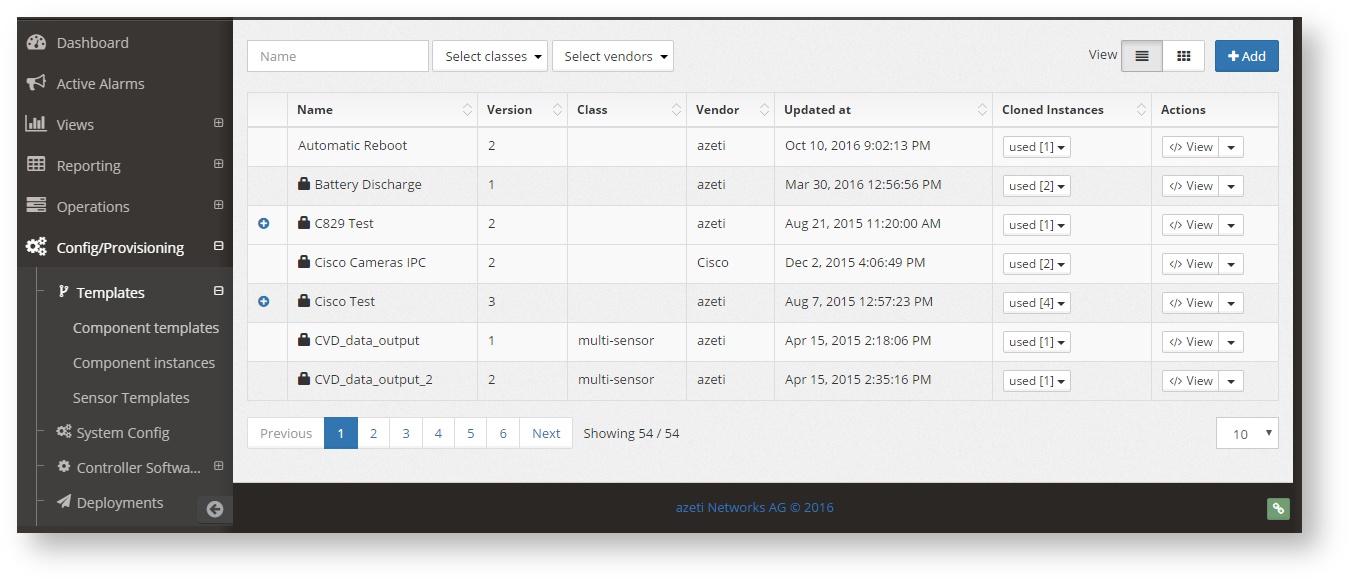
Once uploaded the component will show in the list. It can be found using the search box and the top left of the page, or using some of the filters. The options then are:
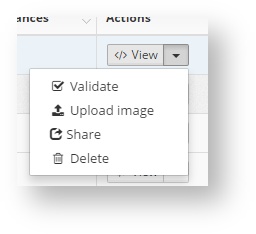
- View: Will show the xml content of the template
- Validate: This will validate the xml content against the xsd to check that the file is syntactically correct. Being incorrect will not invalidate the upload, as it can be fixed later on the component instances of site templates.
- Upload Image: And image file can be uploaded to be shown on the page, beside the component name. Can be, for example, a sensor picture or a vendor logo.
- Share: To share the component with another organization.
- Delete: Permanently deletes the template. It is now allowed it the template is in use.
After the component template is uploaded, a component instance that uses is it can be created:
- Go to Configuration → Templates → Component Instances
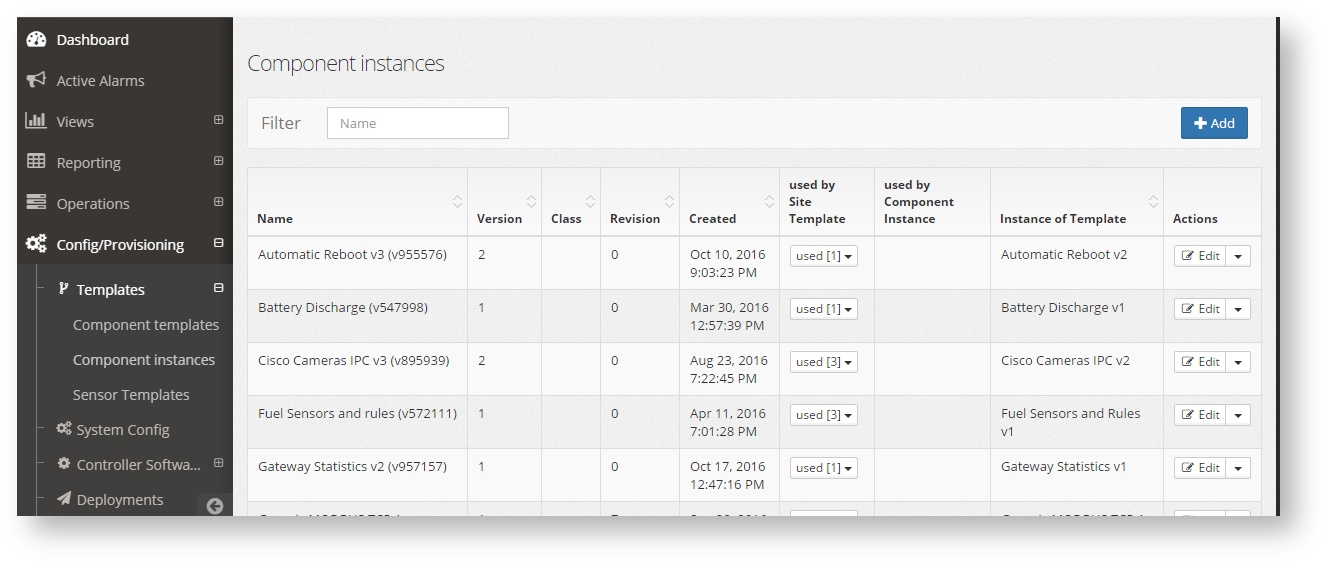
- Click +Add to create a new instance
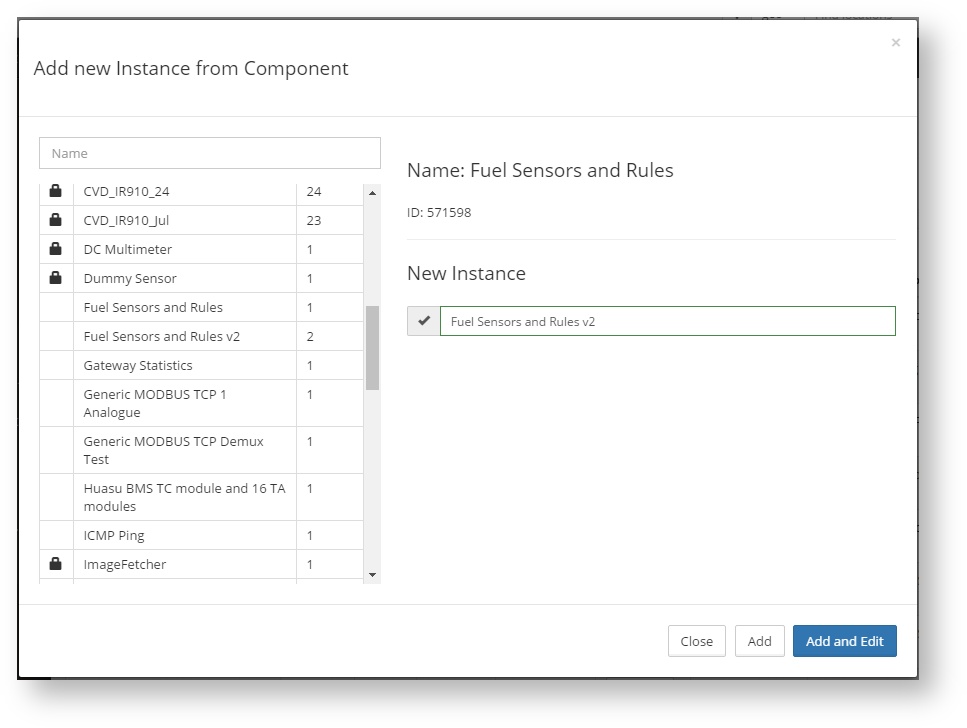
- Select the component which will be the base for the component instance. Change the name of the instance if needed and click Add to create it, or Add and Edit to create it an go directly to the edit page.
Once the instance is created it can be edited at any time by click on the edit button of the same page (see Editing Templates and Components). Other options are:
- Validate, against the xsd, to check that is syntactically correct.
- Clone, to make a exact copy of the template.
- Delete, to permanently delete the instance. Will only work if is not being used.
Creating and Editing Site Templates
The site templates are the ones that will be assigned directly to a site. Typically they will exist as many site templates as types of site, meaning types of sites as those that have the same sensors and configuration.
To edit or create a site template go to Configuration → Site Templates
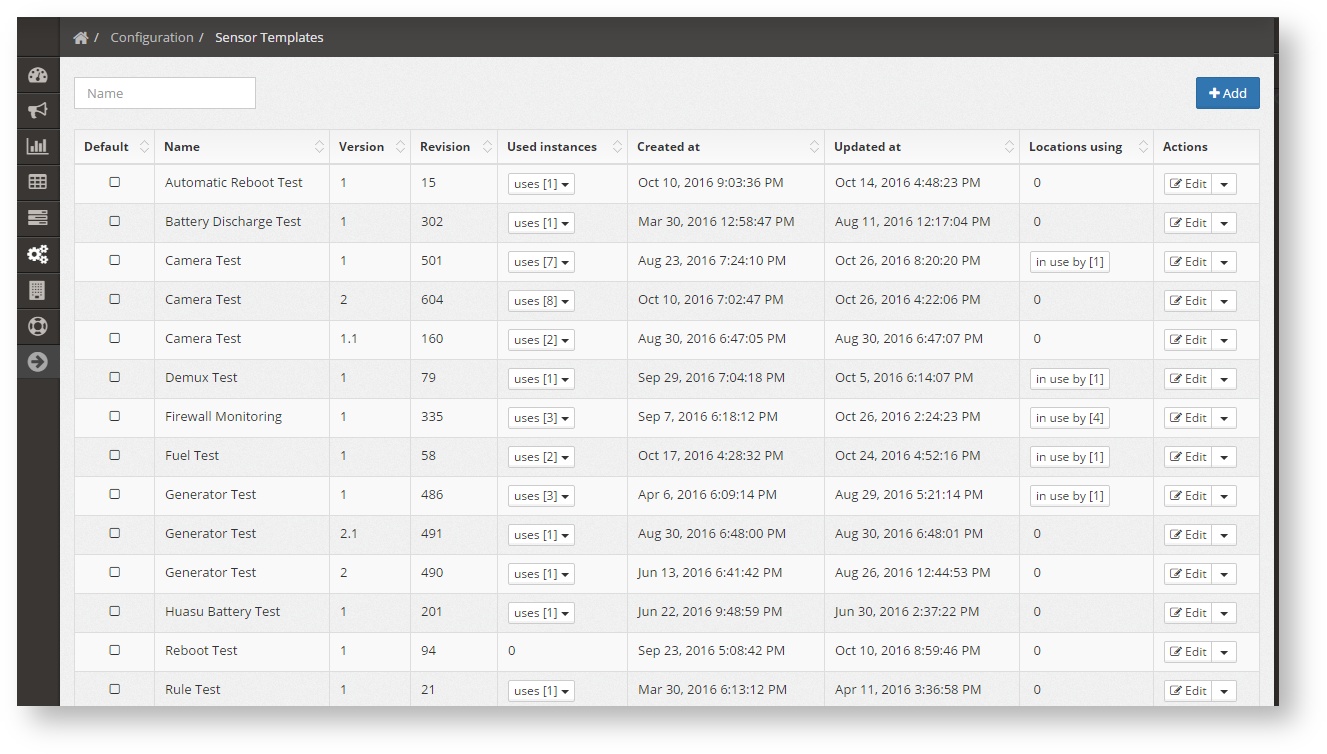
Each templates shows:
- If is the default template
- The name of the template (as set when created)
- The version (as set when created)
- The revision (set automatically by the system with each editing)
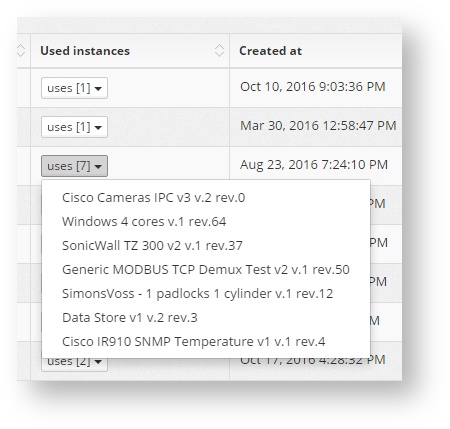
- The used instances (the component instances the make this site template). Click over it to show the list and click on a name to go directly to the component instance.
- The creation date
- The last update date
- The number of locations that have assigned this template. Click on the number (
 ) to see the complete list. Clicking on a name will take the user to the site Admin & Live table.
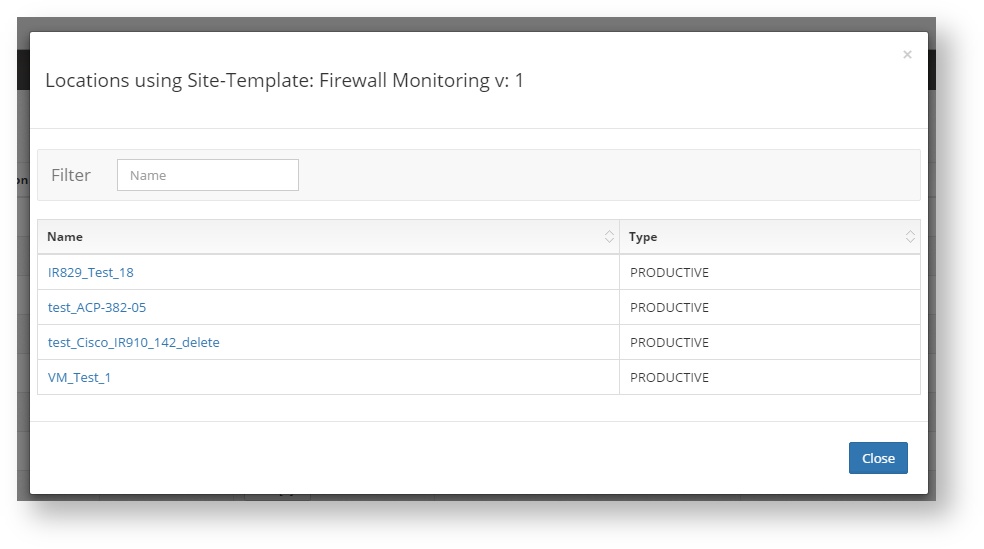
- The actions available for the each template, which are:
- Edit To edit the template content (see Editing Templates and Components)
- Set Default To set the template as the default to be deployed to the sites that have the auto deployment enabled.
- Delete To delete the template permanently. This cannot be undone, and is only available when the template is not in use by any site.
Creating Templates
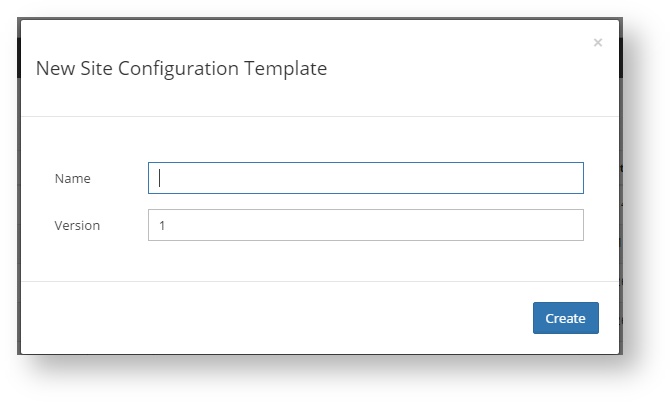
To create a new site template click +Add. Choose a name and version and click Create.
Once create the new template can be edited in the normal way.
Editing Templates and Components Instances
Both the Site Templates and the Component instances can be edited in the same way. The editor page they both use is the same, and can be reached click on the Edit button on both the Component Instances page and the Site Templates page.
Once into the editor the whole xml template is shown as a tree. To expand each tree node click the +.

Expanding the tree lets the user select a sensor, device, action or rule. Once selected the complete tree and configuration for that node is shown:

To actually make any change, click the Toggle SU/Normal mode button  . This will change the template into the Edit mode.
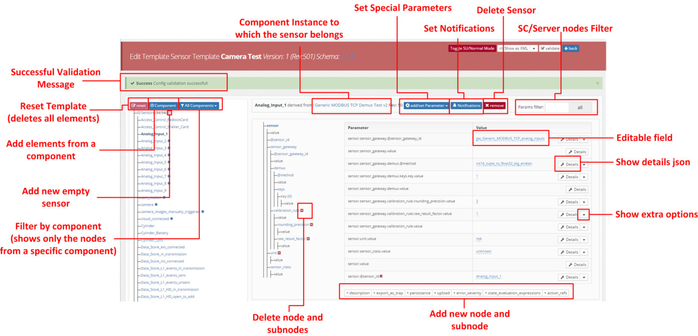
Once in edit mode all changes can be done:
- Add new sensors/devices/actions/rules from a component
- Add empty new sensors/devices/actions/rules
- Edit the existing elements
To see a complete example on how to edit a sensor go to Sensor Configuration from Scratch
System Configs
Controller Software
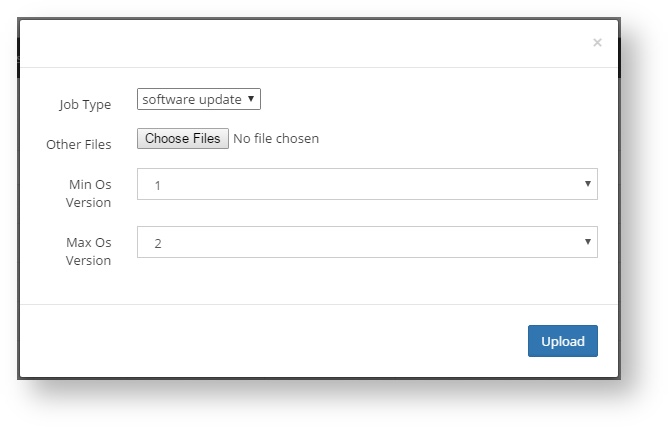
For the deployments, jobs, updates and validations to be done correctly, the correct version of the site controller has to be uploaded to the server. To see which ones are already uploaded go to Configuration → Controller Software → Software Packages.
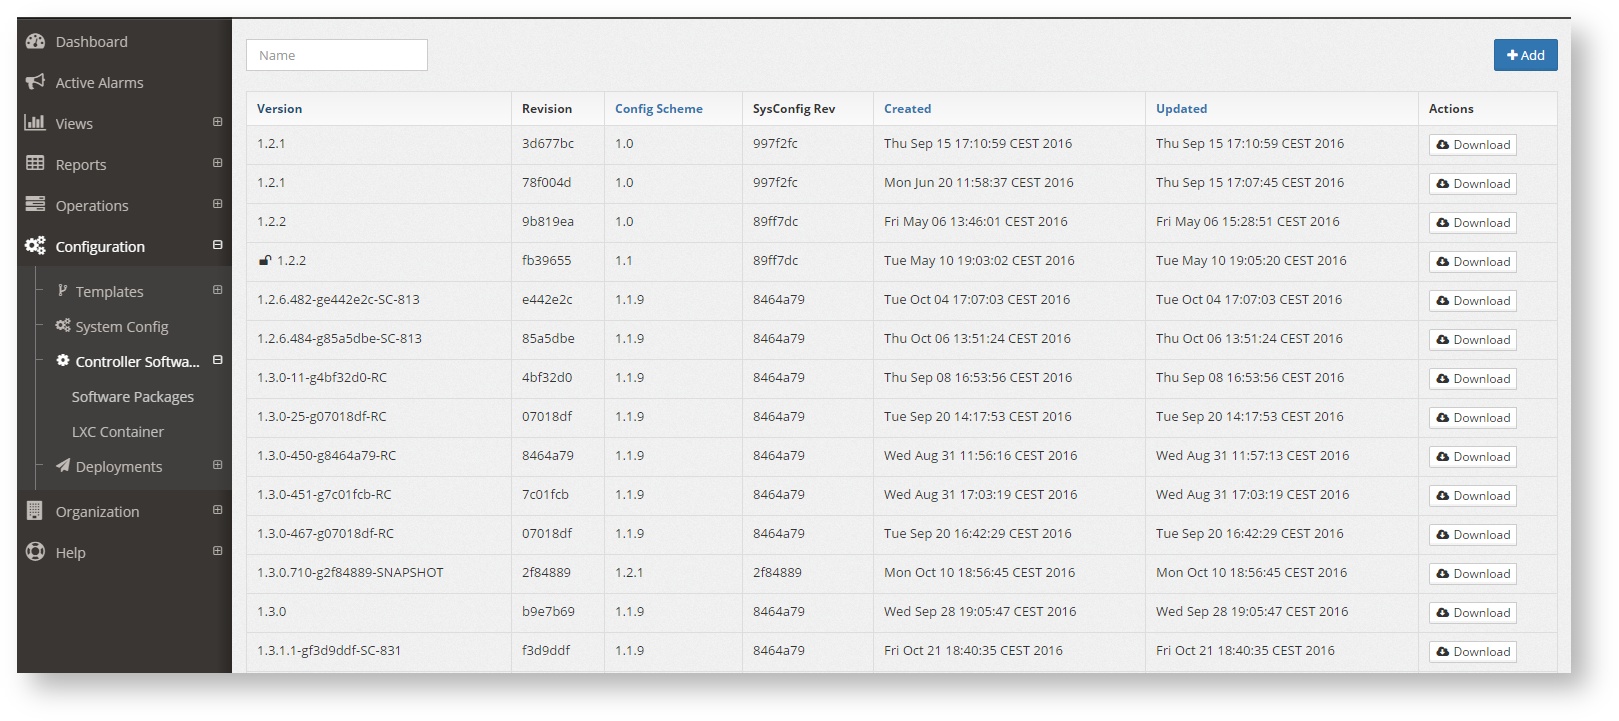
The list shows all the site controller packages that have been uploaded, with the all the details and the possibility to download it.
To upload a new version click +Add and upload the new package.