To allow your local changes to be applied to a SONARPLEX appliance and avoid undefined status when the configuration of the appliance is changed in SONARMANAGER, proceed as follows:
- Right-click on an appliance in the left section and select “Lock Configuration” => then the “Lock Configuration” dialog opens
- Click on “Ok” to download the current configuration of the SONARPLEX appliance. Then a “Success” Window informs you that the configuration of the SONARPLEX appliance may only be changed by the current user.
- Make the required changes on the SONARPLEX appliance’s configuration.
Example: Editing time period (see below) - When you finish with the local configuration changes, right-click on the Appliance and select “Configuration Upload” => the changed configuration is transferred to the SONARPLEX appliance.
- After loading your changed configuration, unlock the appliance’s configuration by clicking on the appliance and selecting “Unlock Configuration” => an “Info” Dialog indicates that the SONARPLEX appliance is released for further users.
The SONARPLEX appliance configuration can only be transferred to the appliance if it locked. Further users can only locally change the configuration of the SONARPLEX appliance in SONARMANAGER. To apply this changes, they should wait until the configuration is released. When the configuration is transferred to a SONARPLEX appliance, the existing configuration of the SONARPLEX appliance is overwritten!
Creating and editing a time period
To create a new time period in SONARMANAGER, proceed as follows:
- Double-click on Global Configuration > Timeperiods in the left section
- Right-click to open the context menu and select “Add Timeperiod”. Then the “Timeperiod Configuration” screen opens (see below).
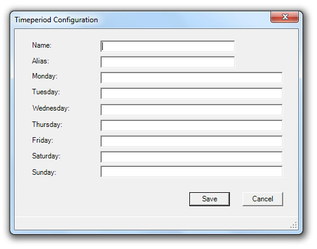
You can find here more details about the parameters. - Click on “Save” to save the created time period configuration
To edit existing time period, proceed as follows:
- Double-click on Global Configuration > Timeperiods in the left section
- Right-click on the existing time period to open the context menu and select “Configuration”. Then the “Timeperiod Configuration” screen opens.
- Enter your changes.
- Click on “Save” to save the changes.
Creating and editing a contact
To create a new contact in SONARMANAGER, proceed as follows:
- Double-click on Global Configuration > Contacts in the left section
Right-click to open the context menu and select “Add Contact”. Then the “Contact Configuration” screen opens (see below).
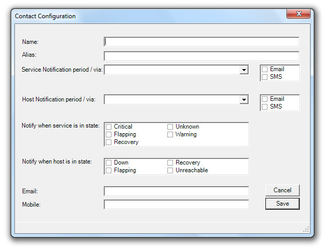
You can find here more details about the parameters.- Click on “Save” to save the created contact configuration
To edit existing contact, proceed as follows:
- Double-click on Global Configuration > Contacts in the left section
- Right-click on the existing contact to open the context menu and select “Configuration”. Then the “Contact Configuration” screen opens.
- Enter your changes.
- Click on “Save” to save the changes.
Creating and editing a contact group
To create a new contact group in SONARMANAGER, proceed as follows:
- Double-click on Global Configuration > ContactGroups in the left section
Right-click to open the context menu and select “Add ContactGroup”. Then the “ContactGroup Configuration” screen opens (see below).
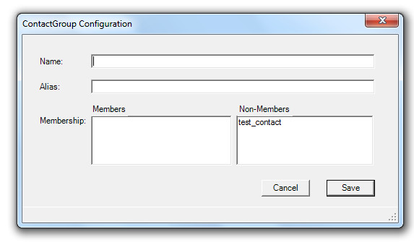
You can find here more details about the parameters.- Click on “Save” to save the created contact group configuration.
To edit existing contact group, proceed as follows:
- Double-click on Global Configuration > ContactGroups in the left section
- Right-click on the existing contact to open the context menu and select “Configuration”. Then the “ContactGroup Configuration” screen opens.
- Enter your changes.
- Click on “Save” to save the changes.
Creating and editing a host
To create a new host in SONARMANAGER, proceed as follows:
- Click on an appliance in the left section and a list of hosts connected to this appliance, if existing, is displayed in the right section
- Right-click in the right section and select “Add Host” => The “Add New Host” screen opens (see below)
You can also:
- Double click on an appliance in the left section
Right-click on “Hosts” and select “Add Host”
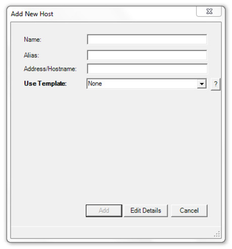
You can find here more details about the parameters. In “Use Template” you can choose a previously created host template. So the settings of the host template will be automatically assigned to the current host.- Click on “Add” to create the host.
- Click on "Edit Details" to make further settings for the new host => The "Host configuration" screen opens (see below).
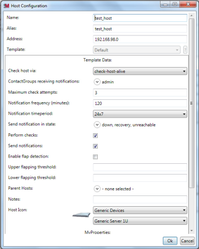
- The information contained in the screen above is explained here.
To edit existing host, proceed as follows:
- Right-click on the existing host in the left section and select “Configuration” => the "Host configuration" screen opens.
- Enter your changes.
- Click on “Ok” to save the changes.