In some cases, you may want to use a specific Site Template (with all revisions you have done so far) in another instance of the azeti Engine (e.g. migrating the site configuration to another instance). In order to use the Site Template on another instance of the azeti Engine, you need to edit a few lines in the XML file of the Site Template, which converts it to a Component Template. This is necessary in order to be recognized by the azeti Engine as Component Template and hence can be uploaded. Once this is done, you can create a Component Instance and based on that the Site Template. The following article will provide you with a step-by-step guide
Converting a Site Template to a Component allows to reuse it globally for your installations. The conversion can be done quickly by altering the XML of the Site Template and declaring it to become a Component template. After an upload it will be recognized as a Component.
| Tip |
|---|
Check out the article /wiki/spaces/SSCL/pages/47775864 which explains tech differences between Site Templates and Components. |
Step-by-step guide
- Log into the Dashboard. Go to Config/Provisioning → Sensor Templates → Site Templates and click on edit next to the location you wish to edit.
- Click on the Dropdown Menu of 'Show as XML' (right arrow next to the button), which is right next to the red 'Toggle SU / Normal Mode' button, and choose 'with server nodes'. The XML file of the Site Template will appear.
- Click on the 'Download' button and save the XML file.
- In the XML file, two sections have to be edited in order to convert the Site Template to a Component Template. The following Code Blocks will provide an example of what needs to be changed.
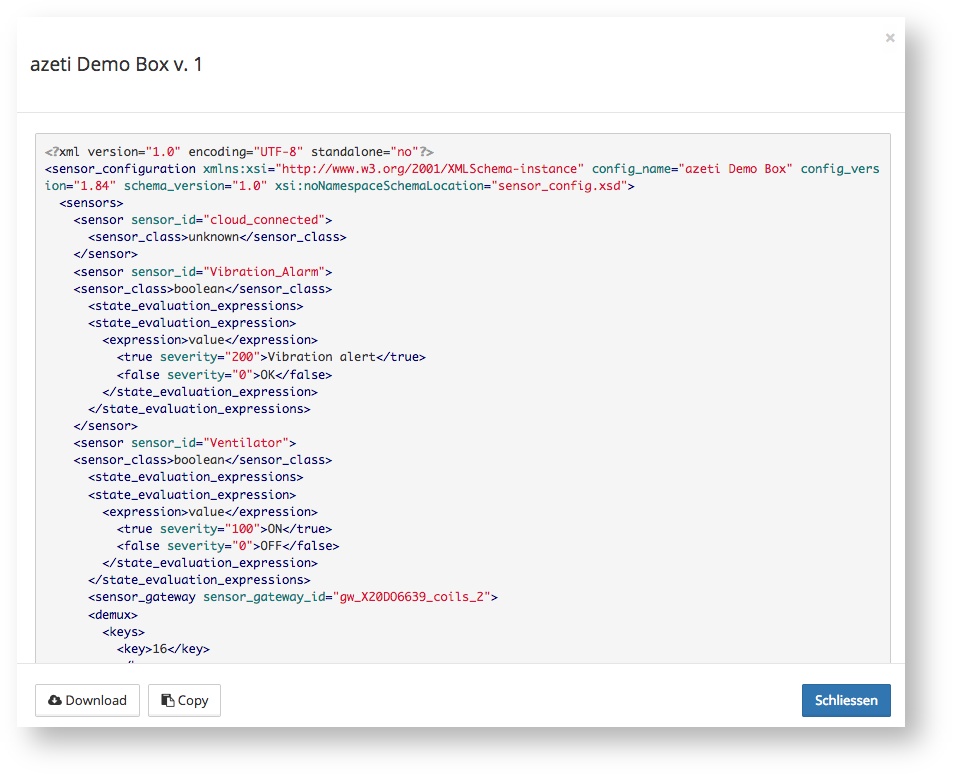
Beginning of the XML
Code Block language xml firstline 1 linenumbers true <?xml version="1.0" encoding="UTF-8" standalone="no"?> <sensor_configuration xmlns:xsi="http://www.w3.org/2001/XMLSchema-instance" config_name="azeti Demo Box" config_version="1.84" schema_version="1.0" xsi:noNamespaceSchemaLocation="sensor_config.xsd"> <sensors> <sensor sensor_id="cloud_connected"> <sensor_class>unknown</sensor_class> </sensor>In the Code Block above (Site Template), lines 2, 3 and 4 have to be edited. The following Code Block (Component Template) shows the changes in line 2, 3, 4 and 5.
Code Block language xml firstline 1 linenumbers true <?xml version="1.0" encoding="UTF-8" standalone="no"?> <component_template config_version="1.0" schema_version="1.0"> <description>azeti Demo Box</description> <vendor>azeti</vendor> <version>1</version> <sensors> <sensor sensor_id="cloud_connected"> <sensor_class>unknown</sensor_class> </sensor>End of the XML
As mentioned before, also a slight change at the end of the XML file is necessary.
Code Block language xml firstline 1097 linenumbers true 0 or 1" sensor_id="Chute_Check" value_type="string"/> </result_list> </false> </condition> </conditions> </rule> </ac_rules> </sensor_configuration>Tip Only the last line (1104) of the Site Template has to be changed. The change is visible in the Code Block below at the last line.
Code Block language xml firstline 1097 linenumbers true 0 or 1" sensor_id="Chute_Check" value_type="string"/> </result_list> </false> </condition> </conditions> </rule> </ac_rules> </component_template>5. Save the changes and upload the Template as a Component Template at Config/Provisioning → Sensor Templates → Component Templates