Cisco IR809/829 LXC Container Installation

Introduction
This document will describe the setup of Site Controller on an lxc container for the IR829/IR809 platforms.
Prerequisites
Make sure to have direct access to the device itself. The 8x9 series offer a direct USB console access which might require driver installation.
See the cisco documentation for further info or the instructions for How to connect the USB console to Cisco 809/829 with OSX
Initial Setup
IR800 enable
IR800# setup
For basic setup, regarding password, hostname and network configuration.
- Secret Password: admin
- Enable Password: password
- Terminal Password: admin
Enable SSH
IR800# configure terminal
IR800#(conf) line vty 0 4
IR800#(conf-line) login local
IR800#(conf-line) transport input ssh
IR800#(conf) hostname [hostname]
IR800#(conf) ip domain-name [domain-name]
IR800#(conf) crypto key generate rsa
SSH Troubleshooting
Sometimes the SSH still does not work - Only had this bug with Putty. Then add these additional lines to the configuration:
IR800#(conf) crypto key generate rsa modulus 2048 label test_key
IR800#(conf) ip ssh rsa keypair-name test_key
Installation Package
Azeti offers a pre-compiled installation package that contains all necessary operating system updates, patches and config files. You can request this package through the Azeti Service Desk here
It contains the following pieces.
Cisco Software
- IOS: ir800-universalk9-bundle.SPA.156-3.M0a.bin
- GOS: ir800-ioxvm.1.2.4.2-T.bin
- ioxclient version 0.3.0 ioxclient
Container and Site Controller
- Package (e.g.
package-SC- 016020302.tar.gz). - File
device_mapping.json(should have been provided to you) device_mapping.json - File
package_config.ini, with the configuration for your SiteController. package_config.ini
If you have a newer version you do not need to downgrade. The procedures should still work. Contact support in case you have any doubt. Jump to the Container installation section if you fulfill the other requisites.
Firmware Bundle Installation
The bundles contain an IOS image as well as a HyperVisor image and are provided through the Cisco Support Websites or through support contracts. Below steps show how to upgrade a device with such a bundle.
Upload through SFTP (SCP)
- Connect to the device Host OS through the network or directly via console
- Enter privileged mode and download the bundle via SFTP (secure FTP over SSH) from your SSH server (you have to set this up in your network, for example on a Linux machine)
IR800> enable
IR800# copy scp://userid@scpServerIp//ir800-universalk9-bundle.SPA.156-3.M0a.bin flash:
Upload through FTP alternatively
IR800# configure terminal
IR800 (config)# ip ftp username chooseuser
IR800 (config)# ip ftp password choosepassword
IR800 (config)# exit
IR809#copy ftp:/ir800-universalk9-bundle.SPA.156-3.M0a.bin flash:
Address or name of remote host []? 192.168.117.50
Source filename [ir800-universalk9-bundle.SPA.156-3.M0a.bin]?
Destination filename [ir800-universalk9-bundle.SPA.156-3.M0a.bin]?
Accessing ftp://192.168.117.50//ir800-universalk9-bundle.SPA.156-3.M0a.bin...
Loading /ir800-universalk9-bundle.SPA.156-3.M0a.bin from 192.168.117.50 (via GigabitEthernet1): !!!!!!!!!!!!!!!!!!!!!!!!!!!!!!!!!!!!!!!!!!!!!!!!!!!!!!!!!!!!!!!!!!!!!!!!!!!!!!!!!!!!!!!!!!!!!!!!!!!!!!!!!!!!!!!!!!!!!!!!!!!!!!!!!!!!!!!!!!!!!!!!!!!!!!!!!!!!!!!!!!!!!!!!!!!!!!!!!!!!!!!!!!!!!!!!!!!!!!!!!!!!!!!!!!!!!!!!!!!!!!!!!!!!!!!!!!!!!!!!!!!!!!!!!!!!!!!!!!!!!!!!!!!!!!!!!!!!!!!!!!!!!!!!!!!!!!!!!!!!!!!!!!!!!!!!!!!!!!!!!!!!!!!!!!!!!!!!!!!!!!!!!!!!!!!!!!!!!!!!!!!!!!!!!!!!!!!!!!!!!!!!!!!!!!!!!!!!!!!!!!!!!!!!!!!!!!!!!!!!!!!!!!!!!!!!!!!!!!!!!!!!!!!!!!!!!!!!!!!!!!!!!!!!!!!!!!!!!!!!!!!!!!!!!!!!!!!!!!!!!!!!!!!!!!!!!!!!!!!!!!!!!!!!!!!!!!!!!!!!!!!!!!!!!!!!!!!!!!!!!!!!!!!!!!!!!!!!!!!!!!!!!!!!!!!!!!!!!!!!!!!!!!!!!!!!!!!!!!!!!!!!!!!
[OK - 160368465 bytes]

160368465 bytes copied in 684.576 secs (234260 bytes/sec)
Install the Bundle
install and apply the new bundle to the device after you've uploaded it. A
SUCCESSmssage should be shown, finally reload the device.IR809#bundle install flash:ir800-universalk9-bundle.SPA.156-3.M0a.bin Installing bundle image: /ir800-universalk9-bundle.SPA.156-3.M0a.bin............................................................................................................. updating Hypervisor image... Sending file modes: C0444 25046869 ir800-hv.srp.SPA.2.5.17 SRP md5 verification passed! updating IOS image... Sending file modes: C0664 63753008 ir800-universalk9-mz.SPA.156-3.M0a IOS md5 verification passed! Done! IR809#Write the new image information into the configuration and reload the device to apply the new images.
ISR809_int_test#write memory
Building configuration...

  [OK]
ISR809_int_test#reload
Proceed with reload? [confirm]
Guest OS installation
Upload the guest OS image
Can be uploaded using scp, ftp or tftp.
IR809#copy tftp:ir800-ioxvm.1.2.4.2-T.bin flash:
Address or name of remote host [192.168.117.50]?
Source filename [ir800-ioxvm.1.2.4.2-T.bin]?
Destination filename [ir800-ioxvm.1.2.4.2-T.bin]?
Accessing tftp://192.168.117.50/ir800-ioxvm.1.2.4.2-T.bin...
Loading ir800-ioxvm.1.2.4.2-T.bin from 192.168.117.50 (via GigabitEthernet1): !O!!!!!!!!!!!!!!!!!!!!!!!!!!!!!!!!!!!!!!!!!!!!!!!!!!!!!!!!!!!!!!!!!!!!!!!!!!!!!!!!!!!!!!!!!!!!!!!!!!!!!!!!!!!!!!!!!!!!!!!!!!!!!!!!!!!!!!!!!!!!!!!!!!!!!!!!!!!!!!!!!!!!!!!!!!!!!!!!!!!!!!!!!!!!!!!!!!!!!!!!!!!!!!!!!!!!!!!!!!!!!!!!!!!!!!!!!!!!!!!!!!!!!!!!!!!!!!!!!!!!!!!!!!!!!!!!!!!!!!!!!!!!!!!!!!!!!!!!!!!!!!!!!!!!!!!!!
[OK - 80196785 bytes]

80196785 bytes copied in 317.274 secs (252768 bytes/sec)
Install the guest OS
The install step has a "verify" word in the end, that differs from the standard Cisco guide at the moment. It is necessarily to fulfill the installation of the GOS.
#guest-os 1 stop
#guest-os 1 image uninstall
#guest-os 1 image install flash:ir800-ioxvm.1.2.4.2-T.bin verify
#guest-os 1 start
To verify if the GOS is actually running, test it with these step.
IR809#show platform guest-os
Guest OS status:
Installation: Cisco-GOS,version-1.2.4.2
State: RUNNING

IR809#show iox host list detail

IOX Server is running. Process ID: 321
Count of hosts registered: 1

Host registered:
===============
    IOX Server Address: FE80::200:CFF:FEEF:DCA9; Port: 22222

    Link Local Address of Host: FE80::1FF:FE90:8B05
    IPV4 Address of Host:       192.168.1.3
    IPV6 Address of Host:       fe80::1ff:fe90:8b05
    Client Version:             0.4
    Session ID:                 1
    OS Nodename:                IR809-GOS-1
    Host Hardware Vendor:       Cisco Systems, Inc.
    Host Hardware Version:      1.0
    Host Card Type:             not implemented
    Host OS Version:            1.2.4.2
    OS status:                  RUNNING

    Interface Hardware Vendor:  None
    Interface Hardware Version: None
    Interface Card Type:        None

    Applications Registered:
    =======================
        Count of applications registered by this host: 0
If the GOS is not running, then make sure the interface GigabitEthernet 2 (or 5 for 829) is not shut down and has ipv6 enabled.
To access the GOS through SSH, it is necessary to enable SSH.
#iox host exec enablessh [GOS-NAME]
Container installation using the ioxclient
Use the ioxclient tool in your system (a remote linux computer) in order to install and start the container.
Creation of the profile
Run the commands and answer the necessary information.
$./ioxclient profiles list
$./ioxclient profiles create
After that, when listing profiles, you should see the following:
The package_config.ini contains your Site Controller configuration. You will need to do a basic configuration of the system in order to connect to the cloud server. You should have received all the credentials beforehand, contact your provider in case you miss some information.Edit this file before you apply it to the container.
yourboxname:~/IR829$ ./ioxclient profiles create IR829
Active Profile :  IR829
Enter a name for this profile : IR829
Your IOx platform's IP address[127.0.0.1] : 192.168.118.18
Your IOx platform's port number[8443] :
Authorized user name[root] : cisco
Password for cisco :
Local repository path on IOx platform[/software/downloads]:
URL Scheme (http/https) [https]:
API Prefix[/iox/api/v2/hosting/]:
Your IOx platform's SSH Port[2222]: 22
Activating Profile  IR829
The user name and password are the one that have privilege 15 in the running config:
username cisco privilege 15 password 0 cisco
Installation and activation of the package
See below the commands and the expected output:
$ ./ioxclient app install sc package-2016022301.tar.gz
Currently using profile :  IR829
Command Name: application-install
Installation Successful. App is available at :  https://192.168.118.18:8443/iox/api/v2/hosting/apps/sc
Successfully deployed
$ ./ioxclient app activate sc --payload device_mapping.json
Currently using profile :  IR829
Command Name: application-activate
Payload file : device_mapping.json. Will pass it as application/json in request body..
App sc is Activated
$ ./ioxclient app setconfig sc package_config.ini
Currently using profile :  IR829
Command Name: application-setconfig
Successfully updated apps configuration.
Starting and stopping the container
$./ioxclient app start sc
$./ioxclient app stop sc
Deactivating and uninstalling the container
$./ioxclient app stop sc1
$./ioxclient app deactivate sc1
$./ioxclient app uninstall sc1
Container installation using the Cisco IOx Local Manager (web manager)
The general procedure to install the app on the IOx is the following:
- Access the IOx Local Manager
- Install the application package
- Activate the application
- Change the application configuration
- Start the application
See the following sections for more detailed information on each step.
Accessing the Local Manager
Access the Cisco IOx Local Manager using a web browser (Firefox recommended). Go to the URL https://GOS_IP:8443/ The IP is that is nated on the router from the GOS IP, port 8443, to the outside, port 8443.
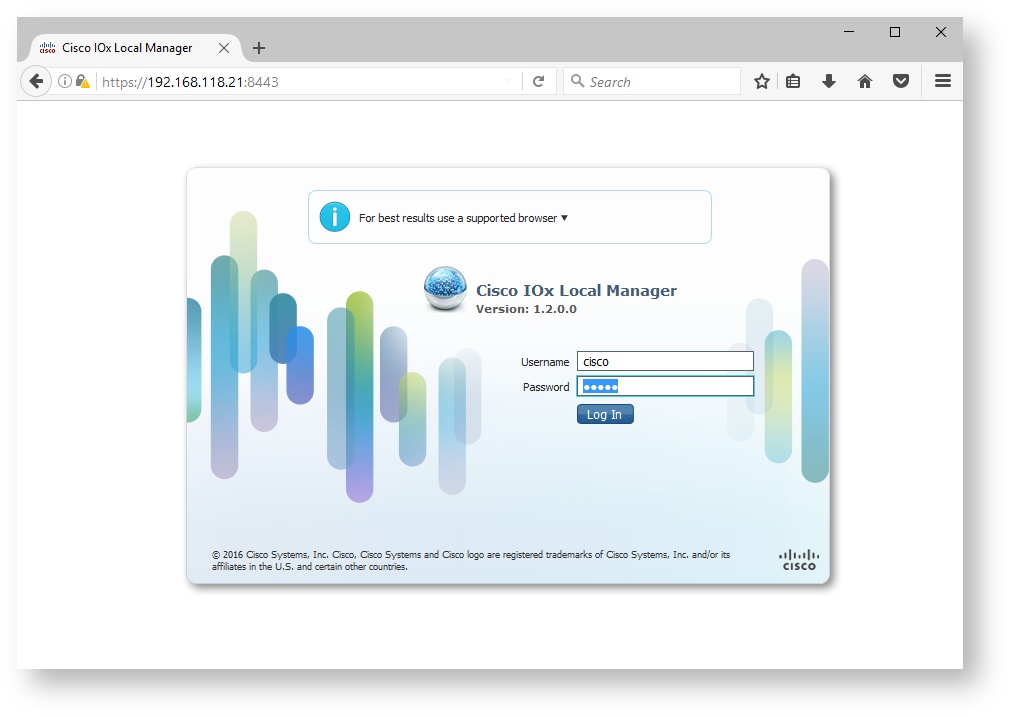
To login use a user and password that has at least privilege 15 on the IOS configuration.
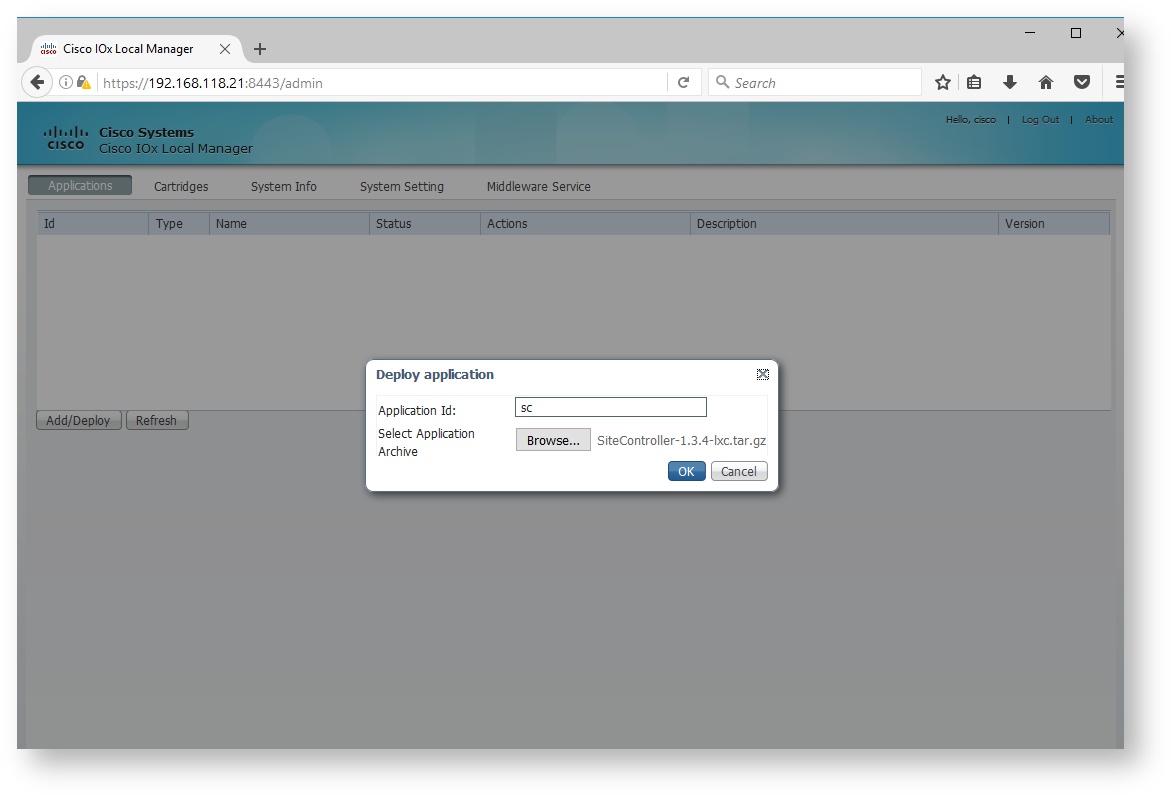
Installation of the package
To install the application package after the login:
- In the applications tab, click Add/Deploy
- Enter the application id. This is the name that will identify the app, and it can be any.
- Select the application archive. This is the tar.gz archive that contain the app.
- Click OK and wait for the application to deploy. Depending on the network speed this can take a few minutes.
Activation of the app
After the application has been installed, it is in deploy state. The next stop would be to activate it. To do so:
- On the application tab, click on activate on the app.

In the next screen, select async 0and make sure that the selected Resource Profile is c1.large
Some IOx versions have a bug that shows the CPU and Memory empty the first time the page is loaded. A workaround is to select another profile, and then change it back to c1.large. Then the correct values for CPU and Memory will be shown.

- Click the button Activate and wait for a few minutes.
Configuration change
Once the application is activated it will show in ACTIVATED state.

The application is provided with the standard configuration. Before is started, it is convenient to customize the configuration. To do so:
- Click on manage or go to to the tab of the same name as the application id (in this example sc)
- Go to App-Config
- Change the configuration file as desired.
- Click Save and confirm.
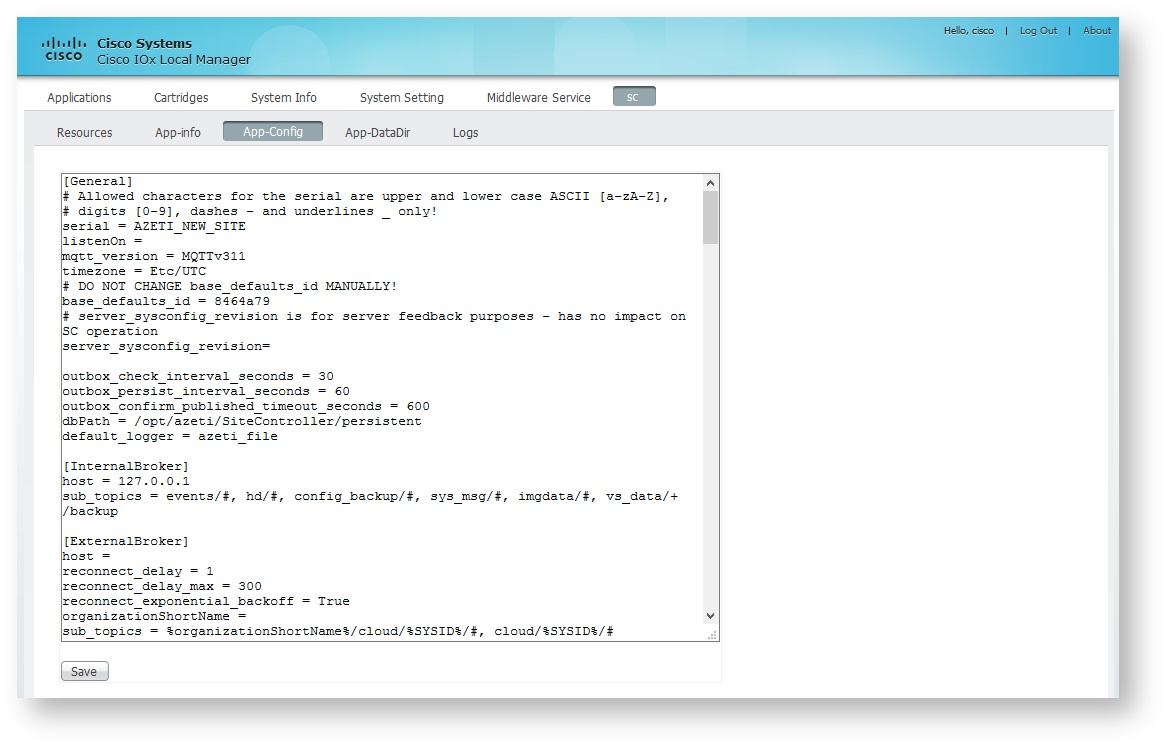
At least the following parameters need to be changed for the SC to work correctly:
- [General] Section:
- serial This is the id that will identify this SiteController on the server. It has to be unique per server
- [ExternalBroker] Section
- host The broker server IP or domain name
- organizationShortName The organization short name to where this SiteController will be assigned.
user_id A user id created in this organization that has the Gateway settings enabled
password the password for the user
All this parameters should be provided by the administrator.
Starting and Stopping the Application
After all the previous steps have been completed the application can be started. To do so just click start on the application.

The application will then change to RUNNING state

To stop it just click on stop.
It is necessary to stop and start again the application after any configuration change.
Container Usage
Find common commands for the container usage and administration below.
Accessing the GOS console
The guest OS console can be accessed by doing a telnet to any of the IPs of the device, port 2070
IR809>enable
Password:
IR809#telnet 192.168.1.1 2070
Trying 192.168.1.1, 2070 ... Open

Poky (Yocto Project Reference Distro) 1.8 IR809-GOS-1 /dev/ttyS0

IR809-GOS-1 login: root
Last login: Thu Nov 24 16:28:00 UTC 2016 on ttyS0
Stopping system log daemon...0
Stopping kernel log daemon...0
Starting system log daemon...0
Starting kernel log daemon...1
root@IR809-GOS-1:~#
The default login is root, without password. To change between the console and the IOS shell, press Shift+Ctrl+6 and then x. To go back to the console from IOS just press <Enter>(the line being empty).
Depending on the router configuration, before being able to access the console, the router will ask again for the login authentication. Use then the same credentials used to login the router.
For the console access to work, the line 1/4 has to be enabled on the IOS configuration:
line 1/4
 transport preferred none
 transport input all
 transport output none
 stopbits 1
Accessing the console on the container
Normally you will manage the device with the ioxclient or the fog director. You will need to access the console to do maintenance operations inside the container (check logs, edit files, code, etc).
$./ioxclient app console sc
$ssh -p 22 -i sc.pem appconsole@192.168.118.18
Alternative you can access the installed Container through the GOS with the following command
$virsh console sc
When you access to the container, you will see its console. Press <Enter> to start working with the container, you will need the root password. In order to leave the session, you will need to use the combination <Ctrl>+<]>.
Giving the container access to the network
The container is given a new internal IP in the router. You will need to link it to the external interface and adjust the NAT rules in order that the container has access to the outside world. Contact you network engineer for configuring the full NAT rule set and routing and refer to the IOS Running Configuration as a template.
Find an example snippet below.
!
ip nat source static 192.168.1.3 192.168.118.18
ip nat inside source static 192.168.1.3 192.168.118.18
!
IOS Running Configuration
This is an example of a running configuration for a IR829 with a container installation.
When editing this file, pay special attention to the firmware version. Use the latest firmware version recommended in the "Cisco Software" part of this document
Troubleshooting
If you do not have access to the network from the container
conf t
ip nat inside source list NAT_ACL interface vlan1 overload
exit
conf t
ip access-list standard NAT_ACL
 permit 192.168.0.0 0.0.255.255
Note: for 809 there is no vlan, therefore use the interface where the vlan is connected (GigabitEthernet0).
If you want to reconfigure the DNS
ip dhcp pool gospool
 network 192.168.1.0 255.255.255.248
 default-router 192.168.1.1
 domain-name azeti.com
 dns-server 192.168.115.5
 lease 5
Nothing seems to work anymore. You want to reinstall GOS.
The GOS sometimes gets corrupted. Execute the following command before the new installation, or your problems with the caf will still be there after installing the new GOS:
rm -rf /software/caf/work
Known issues
Fixed MODBUS RTU Speeds
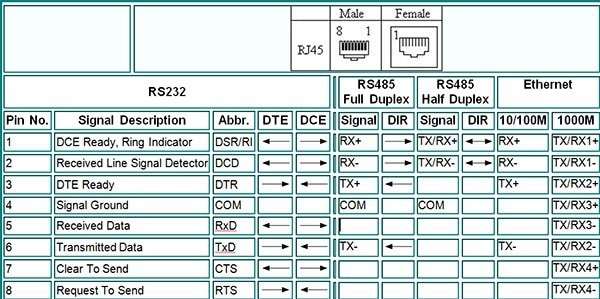
The RTU connection for the 809/829 is limited to a fixed speed, parity and stop bits. You must choose a common speed for all your devices. The described configuration is for 9600 bps, parity none, 8 bits, 1 stop bit.
IOX Client Bug
There is a bug in the IOX Client which requires the installation of a patched file, to do so please see IOX Client Patch Installation
Appendix
Pin-Out of serial ports for the IR809/829 architecture