...
- Click on File > New Project
- Enter a password and confirm it by using the “Set Project Password” dialog
- Add a locaton via right click on “All Appliances” on the left side
- Enter a location or costumer name and click “Ok”. The selection of the name depends on the current project or on the network structure to be monitored.
You can modify the “Location” entry at any time to take a changed network structure into account (e.g. in case of relocation) by right clicking on the location and then choosing “Rename Location” Click on Setup > Add Appliance => The “Add new Appliance” screnn opens (see picture below). For more details above the parameters, see the opposite table.
Section Column 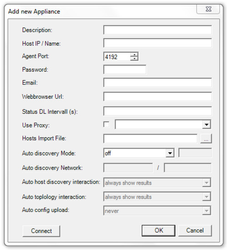
Column Parameter Description Description A meaningful description or name for the SONARPLEX appliance Host IP / Name The IP address of a SONARPLEX appliance Agent Port The port to access that SONARPLEX appliance if it is not the location Password The administrator password of that SONARPLEX appliance Email The e-mail address of the user who is responsible for the SONARPLEX appliance Webbrowser Url Status DL Intervall (s) Use Proxy Hosts Import Files Auto discovery Mode Auto discovery network Auto host discovery interaction Auto toplology interaction Auto config upload - Fill the input boxes with the corresponding information.
- Click on “Connect” to check the connection to a SONARPLEX appliance. If there is a wrong value in one of the input boxes (e.g. a wrong administrator password or a wrong port), a corresponding message is displayed (e.g. “Wrong PW”). Repeat step 6 and correct your entry.
- Click on “OK”
Automatic search for available hosts and adding to a SONARPLEX applianceAnchor SM Host Discovery SM Host Discovery
...